
14.1 FINAL PROJECT: Collaborative AniJam Animation
Important (Be sure to read this.)
This Final is due on May 17th. No late work accepted for the Final. Final is weighed at 15% of Course Grade.
Your Student Lounge Assignments will be different for the rest of the semester. Although there is just one primary assignment for the Final, you will still have weekly Student Lounge Assignments, and these will be used in support of your Final. You will need to make progress on your Final each week to be able to submit your Student Lounge Assignments. This will help keep you on track.
Be sure to use the Updated Norman Rig for this assignment.
For this Final, your playblasted video must flow seamlessly with other students' videos (Camera, Render Settings, and Norman's Start/End pose match other videos). During the first week of your Final Project, you will begin your setup work, setup your constraints (required), and aim to get your primary storytelling poses created. You will create a Work-In-Progress playblast to double check your playblasts with your classmates to make sure you are all using the same settings. You are doing this to check the hook-ups (the start and ends of your videos) to be sure everything matches. The animation you are creating in the middle won't be final in your Student Lounge links (you will upload your Work-In-Progress Maya Project (Naming Convention: Lastname_Final) to a subfolder (WorkInProgress01) within your Final Module folder in your Google Drive). You will be showing your classmates your Work-In-Progress.
Help each other out. Kindly point out if their settings do not match, and give suggestions.
For the Second week, you will focus on creating your breakdowns and inbetweens.
For the Third week, you will polish your animation.
Purpose
To animate a final project, and to create a collaborative piece with your classmates. You will also learn about constraining objects. You must use Maya Constraints for this final assignment. You can learn more about Constraints in the Resources to Help below, under Constraints (how to get Norman to hold and release an object).
AniJams are collaborative animation projects.
I would say there are at least two kinds of "AniJams":
1. AnimJams are timed competitions during which a team of animators create an animated short in a single day or 48 hours. Here's a video that shows that sort of AnimJam process: Exceptional Mind's' Anijam - 48 Hour Animation Competition Links to an external site.
2. AnimJam as a class exercise: Using a single camera view provided by the instructor, and a start pose is created by the instructor, each student creates their own unique animation using the same rig (you will use Norman). The students' animation must hold the same start and end pose for 4 frames (half a beat) at the beginning and end of their animation. Students animate their own unique piece that begins with the given pose and ends with the same pose. All animators playblast or render out their animation. The students final videos are edited together into a single, continuous video that flows in and out of the pose created by the instructor. The final video is the a creation of the entire class. When the videos are edited together, there will be an 8 frame pause (4 frames from the end of one student's video plus 4 frames from the start of the next student's video) between each student's animation.
For this class final, you will do the second kind of AnimJam.
The shared pose will be of Norman with his hand in a box on a counter. The shared camera will frame Norman and the box on the counter in a 3/4 view. Both the shared pose and the shared camera will be provided by the instructor.
Do not change the start/end pose or the provided camera, or the final short film will not work.
In your animation, you will have Norman lift a "simple object" (a Maya polygon primative object (i.e. sphere or box)) out of the box on the counter.
You will animate Norman reacting emotionally to the object, and then animate Norman getting rid of the object.
The object that he pulls out of the box on the counter must disappear by the end of the animation.
By the end of your animation, Norman must have reached his hand back into the box (in exactly the same pose as the instructor-created pose), ready for the next student's animation.
This assignment requires the use of Maya Constraints.
Make sure Norman holds the object before he pulls it out of the box (Constraint must be turned ON (set to 1)) then releases the object before the end of the animation (Constraint must be turned OFF (set to 0). You must use Maya Constraints for this.
Constraints (how to get Norman to hold and release an object)
from Learn to become an Animator How to use Parent Constrain in Maya | Create parent Constrain in Maya Links to an external site.
from AnimSchoolAn In-Depth Guide to Maya Constraints Links to an external site.
Task
Setup
Create a new Maya Project. Naming convention: Lastname_Final
Download the updated Norman rig for the AniJam
Place the Norman rig in the Assets folder of your new Lastname_Final Maya Project.
Download the "AniJam Start file"
Place the "AniJam Start file" in the Scenes folder of your new Lastname_Final Maya Project.
Make sure you have your Project Set to your new Lastname_Final Maya Project.
Open the "AniJam Start file."
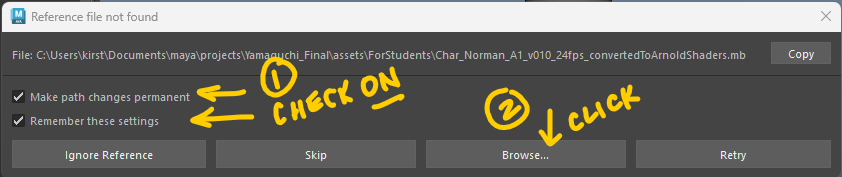
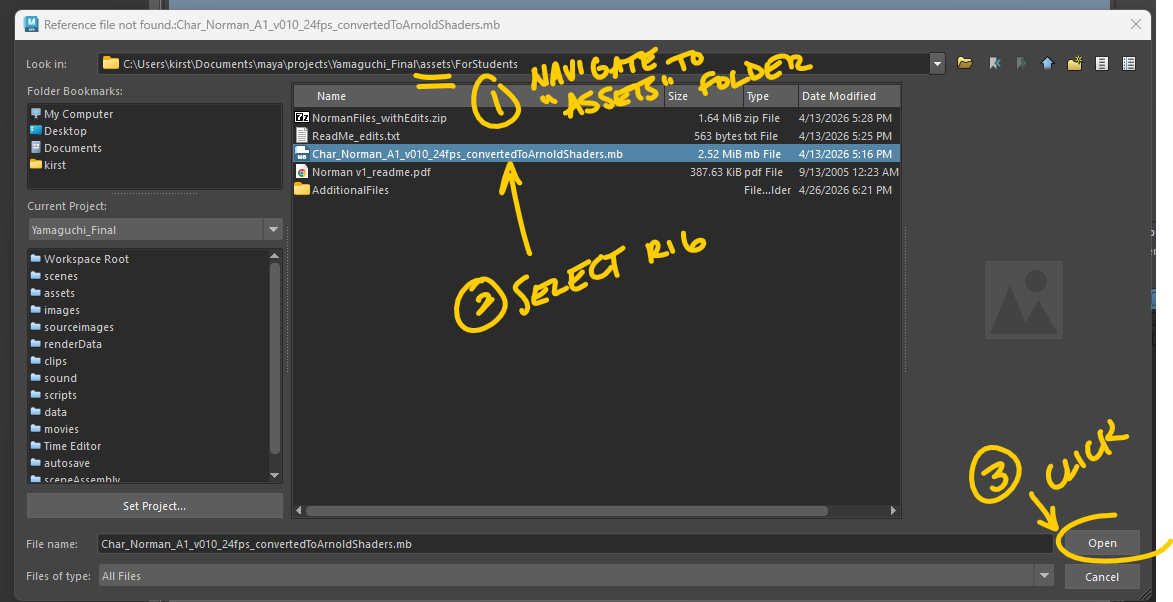
SEE IMAGES 1-3 BELOW You will be prompted with this window that says "Reference file not found." Since Maya is trying to access the rig on my computer, you will need to "replace" the reference so that Maya knows where to find the referenced rig on your computer. You will change the path to the Norman rig that you placed in your Assets folder
Check on "Make path changes permanent" and "Remember these settings."
Click on "Browse"
Navigate to your Assets folder in your new Lastname_Final Maya Project.
Select the Rig
Click Open.
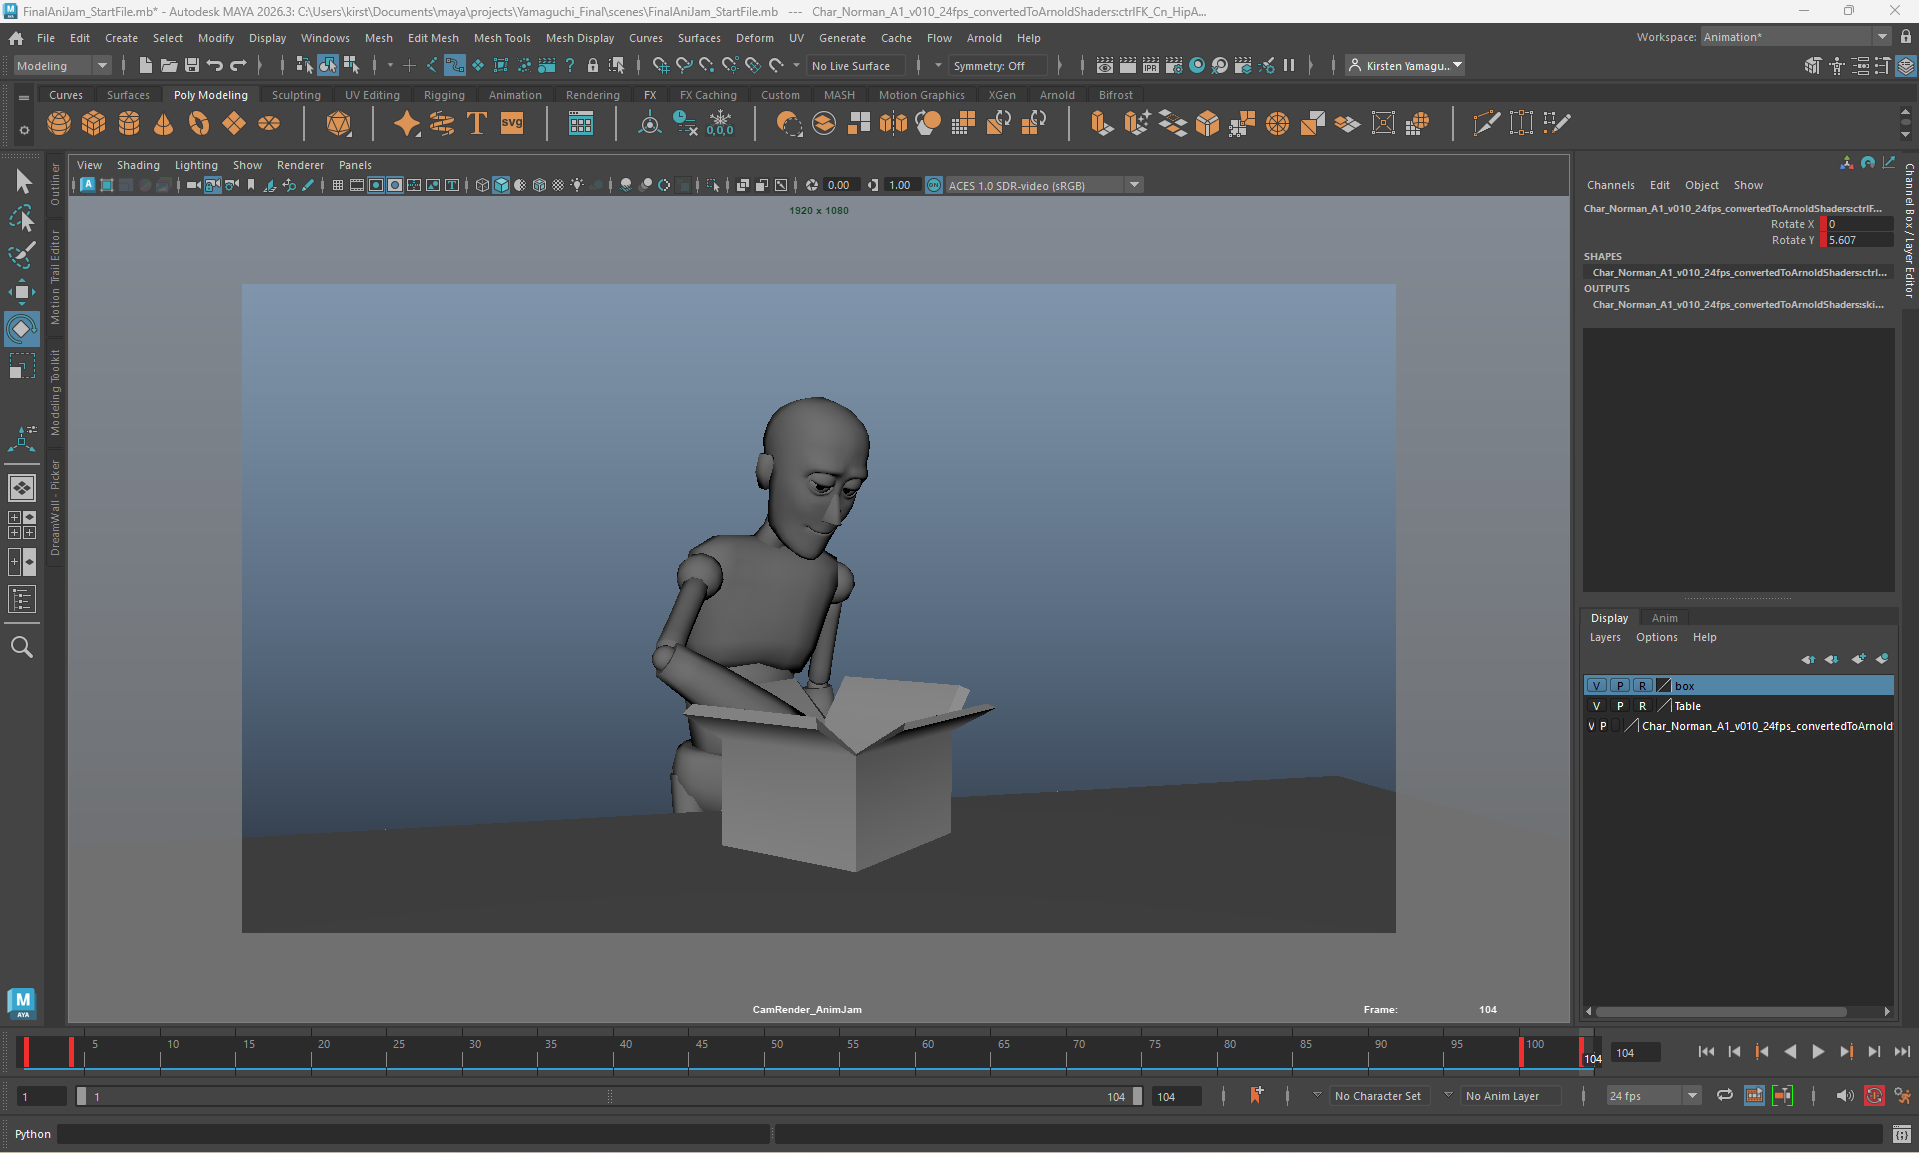
You should see Norman in the scene, in his start/end pose:
Save the "AniJam Start file" as Lastname_AnimJam (keep the original "AniJam Start file" intact so you can go back to it if necessary).
This file has the Provided Camera for this project. It is called "CamRender_AnimJam." Only Playblast from this camera for all submissions.
In this file, do not change the first 4 frames and last 4 frames of the animation. You can select all the controls on the character and move the last two keys to later in the timeline, but your animation must start with 4 frames and end with 4 frames of the held start/end pose.
Animate a minimum of 72 frames and a maximum of 96 frames. The aim is Quality over Quantity. Craft the spacing between each frame. Thinking about "line of action," weight, and appeal, craft your poses.
The start 4 frames and end 4 frames are not included in the 72-96 frame animation requirement, so your final, submitted Playblasted video will be between 80 and 104 frames long.
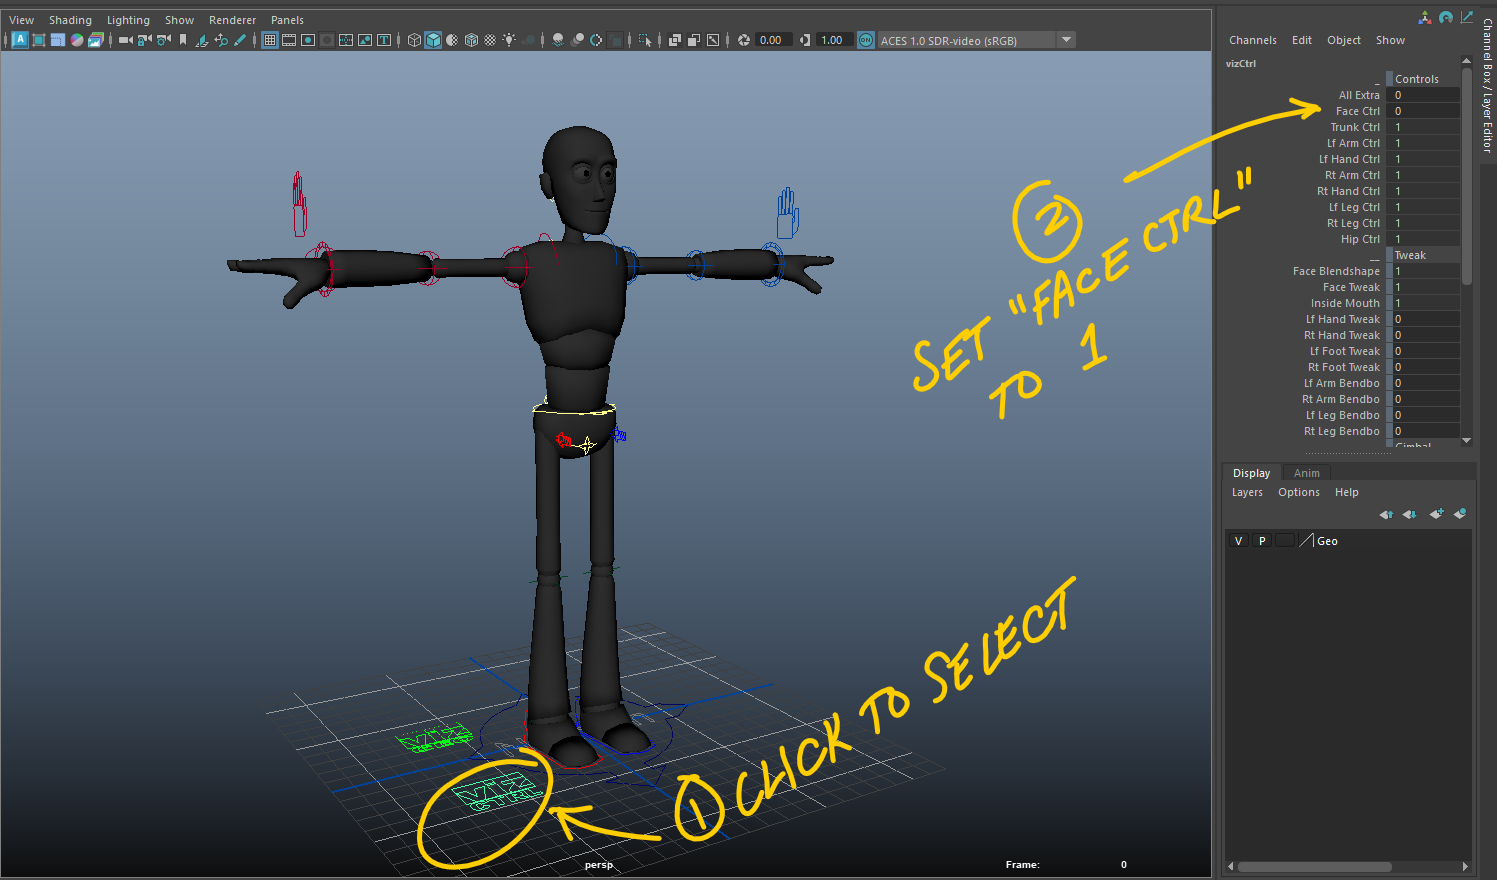
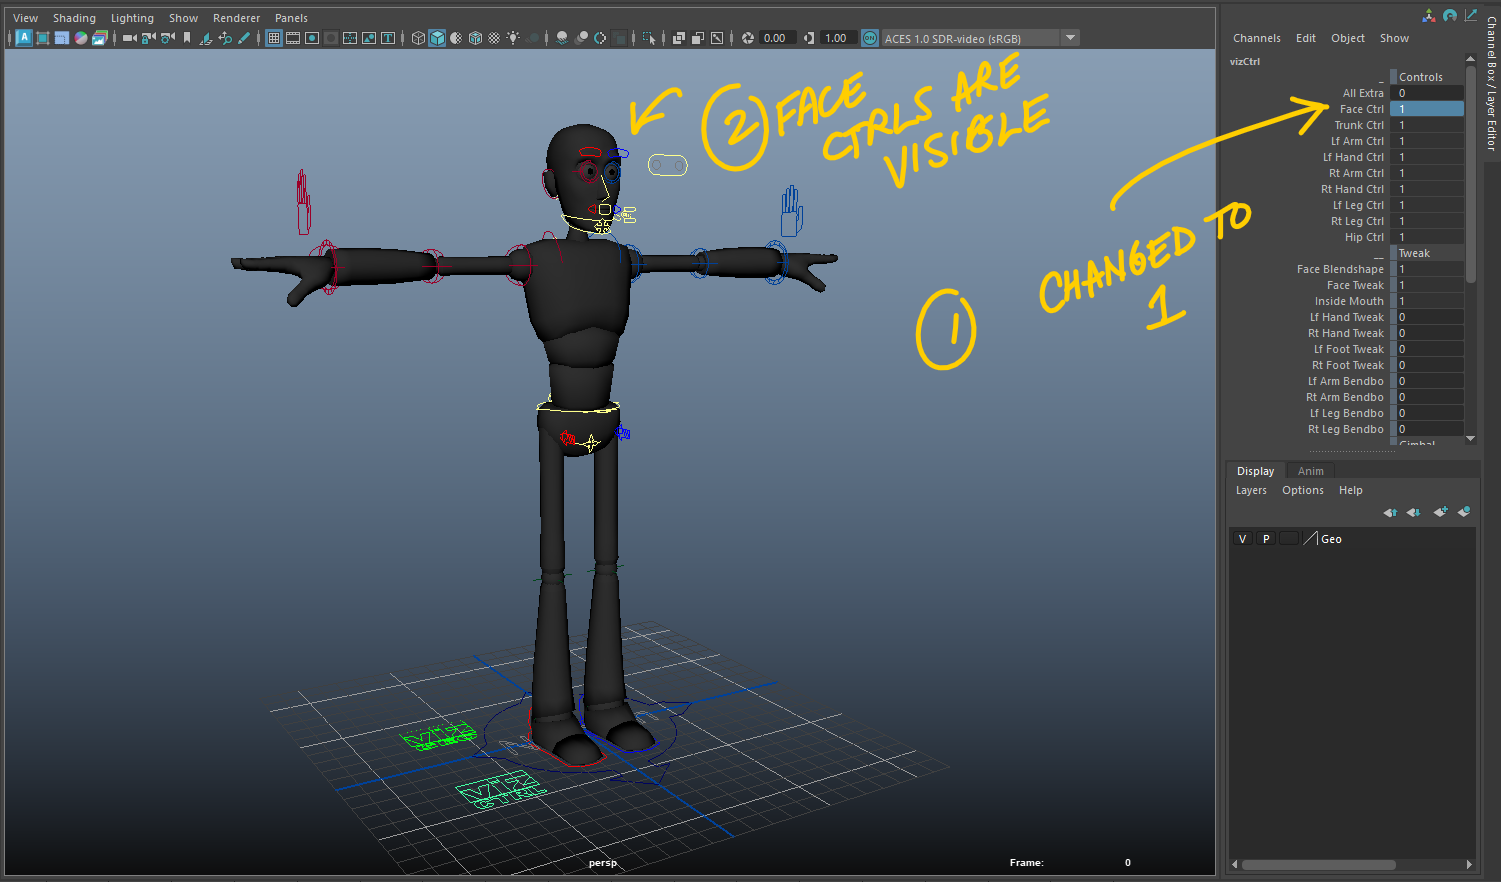
You'll need to animate the face in this assignment. SEE IMAGES 4-5 BELOW. To turn on Norman's facial controls, first select the "Viz Ctrl" that is on the ground near his feet. (I know Norman is in a different pose in these reference images. The "Viz Ctrl" will still be found on the ground. In the channel box, near the top, find "Face Control." Change the value for "Face Control" from 0 to 1. This will turn on the curves you will key and animate for the facial animation.
Recommended settings while animating SEE IMAGES 6-7 BELOW
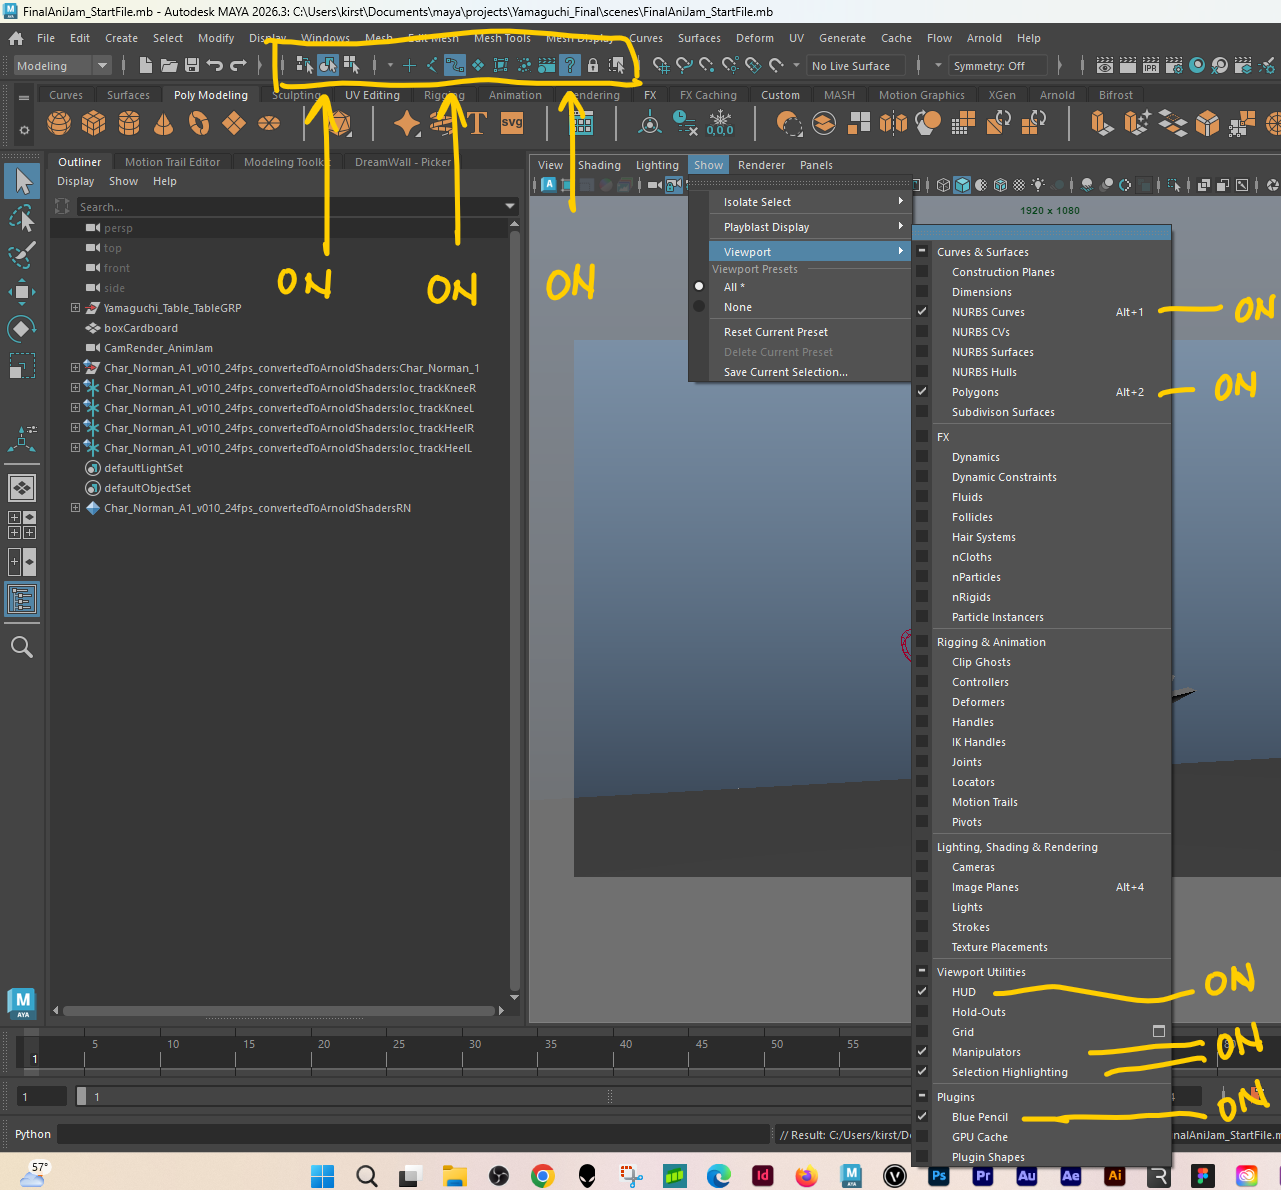
Set to Object Selection Mode (see first button marked as "ON" below).
In the Selection Mask settings, turn off all except "Curves" and "?" (see second and third buttons marked as "ON" below).
In the Viewport settings, turn off all except NURBS Curves, Polygons, HUD, Manipulators, Selection Highlighting, and Blue Pencil.
Make sure your file is set to 24 fps. Turn on Auto Key and Continuous Looping (for playback).
Plan Animation (required), Record a video of yourself acting it out (recommended but not required), and Prepare video reference for animation (recommended but not required)
Brainstorm on paper or in a text doc a few ideas for what object Norman will take out of the box.
Choose a specific object (i.e. tarantula, sticky caramel apple, etc.) for the Maya Polygon Primative object (i.e. sphere or box) to represent. You won't model a detail model for this - you will use a Maya Polygon Primative object (i.e. sphere or box).
One of your challenges will be to use your posing and animation to convey to the audience what kind of object the Maya Polygon Primative object represents. (I want you to focus on your animation for this assignment, and not be distracted by a modeling project. If you want, after this course is over, you can make as specific model and replace the Maya Polygon Primative object).
Decide what kind of reaction Norman will have to the object. This will tell the audience a lot about both the object and about Norman's character. Example reactions: Fear, Excitement, Curiosity, etc.
While not required, I highly recommend you act out what Norman will do, and record video of yourself acting out what you will animate.
If you choose not to shoot video reference, scroll down this page to "Back to the Required Steps."
I recommend choosing your favorite acting take.
Edit your video down to your favorite acting take. This video should be under 6 seconds long. (In later steps, you can play with speeding it up a bit, (I recommend doing this in Maya), so that it is under the 3 second limit).
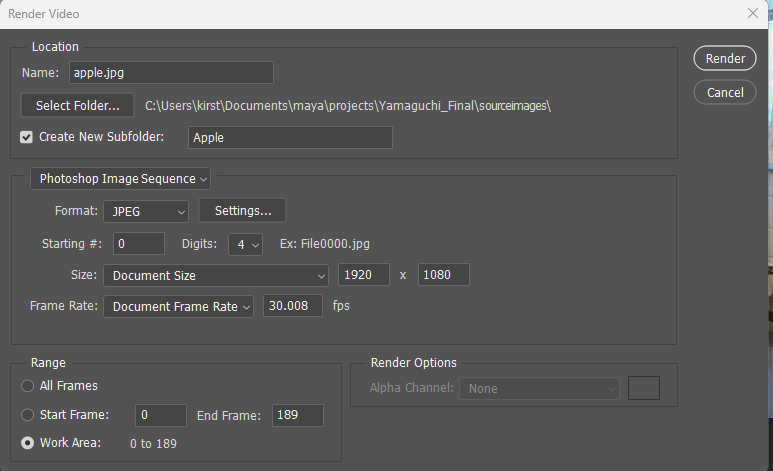
Before speeding up the video, open the video in Photoshop to export your video as an image sequence. For more detailed help on converting video to an image sequence, you can also look at TechRuzz's video linked below in Resources to Help.
When you have your video clip open in Photoshop, use File>Export>Render Video to export.
Change the destination filepath to your Source Images folder in your new Maya Project (Lastname_Final).
Check on the box to Create a Subfolder just for this image sequence that you are creating. I recommend you name the folder after your chosen object.
Just below where you check on the box to "Create a subfolder," it says "Adobe Media Encoder." Click on "Adobe Media Encoder" to access the dropdown menu and switch from Adobe Media Encoder to Photoshop Image Sequence.
Click the "Render" button on the upper right. Photoshop will export the image sequence in your Source Images subfolder.
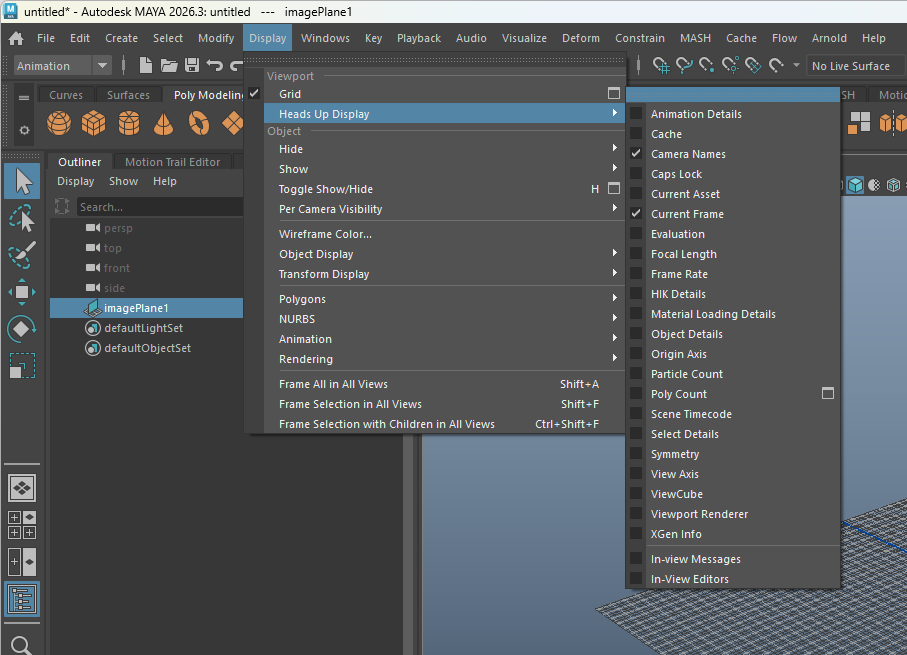
In your Lastname_AnimJam scene file, create a Free Image Plane (go to top menu bar>Create>Free Image Plane). For more help on bringing in Reference on Image Planes, you can also look at CGRiff's video linked below in Resources to Help.
If you don't see the free image plane in your viewport, go to Show>Viewport>Lighting, Shading, Rendering>Image Planes (Check On "Image Planes.")
With the free Image plane selected, it Ctrl- A to open Attribute editor.
In the Attribute Editor, under Image Plane Attributes, find "Image Name." Click on the folder next to "Image Name."
Browse to your Source Images folder and click on the first image in the image sequence you exported from Photoshop. Click Open.
In the Attribute Editor, under the "Image Name" field that you just filled, check on "Use image sequence."
In your viewport, scale up the your Free Image Plane so that the image of you in the video is approximately the same size as Norman in your Maya Scene.
If you want to retime your video footage, go to last frame of your image sequence, then find "Image Number" under the place where you checked on "Use Image Sequence."
Copy the frame number. Rt-click on the frame number and choose break connection. Paste the frame number back in. Rt-click again and choose Set Key. Go to frame 1 in the timeline, then go back to the "Image Number" field in the Attribute Editor (where you broke the connection earlier). Type in 1 in the "Image Number" field, rt-click to Set Key.
In the graph editor, change this graph to a linear graph for the images to play back at the proper speed.
Add keys and change the timing of the video as you see fit.
Back to the Required Steps.
Blocking: Create your storytelling Key poses
While you are Blocking, focus on telling a clear story, giving the audience one piece of information at a time.
Pose the Body. Keep your body posing simple - this is a short animation - just add one Key body pose to help tell the story. I recommend just one pose change in the body. I recommend keying every control on the body for your pose. Make a choice about how each body part would change in this pose. I highly recommend you use your video reference for this. Norman will start in the key pose provided by the instructor. You will add one pose for Norman to move into and act within, and then Norman will move out of that pose to return to the start pose. Pose your key body story pose on Norman. Focus on Clear Storytelling, Line of Action, Realistic Body Mechanics and Appeal. Here's a short video on Line of Action from Stephen Silver: Art Tip 34 | Line of Action | Stephen Silver https://www.youtube.com/watch?v=gho6qVwZFlM
Pose the Face. Much of your acting will happen in the face. Focus on Clear Storytelling. Tell the audience one thing at a time, with clarity. You can add more pose changes on the face than on the body - but limit this as well - you start with the provided pose, then Norman can change his expression 1-3 times, then he must go back to the provided facial pose. See the link for the Living Lines Library under resources for facial pose reference.
Blocking: Set up your Object Constraints
Create your chosen Primitive Object.
Set up constraints on your chosen Primitive Object. Using Maya Constraints, make sure Norman holds the object before he pulls it out of the box (must be constrained) then releases the object before the end of the animation (constraint must be turned off). You must use Maya Constraints for this. You can learn more about Constraints in the Constraints section near the top of this page.
Remember that the required actions for your custom animation section include the following: Norman pulls an object out of the box. Norman looks at object as he pulls it out of the box. Norman reacts to the object. Norman drops or throws the object. Object is not visible on screen at the end of your animation. Norman naturalistically moves back into the start pose by the end of your animation.
Create a Playblast to Share in your Student Lounge Assignment
For the Student Lounge (different this week and for the rest of the semester) you need to share a Playblast of your work in progress.
In Maya, Set the Render Settings to HD 1080. SEE IMAGES 8-11 BELOW for settings
Hide all unnecessary elements in the HUD (Display>HUD) and in the Playblast Viewport settings (go to top of viewport, to Show>Playblast Display).
Use these settings for the HUD (Heads Up Display):
Turn off all (uncheck all boxes) except "Camera Names" and "Current Frame"
Use these settings for the Playblast Viewport settings (go to top of viewport, to Show>Playblast Display).
Turn on (check on) Override Viewport
Below Override Viewport, turn off all (uncheck all boxes) except "Polygons" and "HUD"
Be sure that the start and end pose are still the same as in the original file.
Be sure that the start and end poses are held for 4 frames at the start and 4 frames at the end of the animation.
Playblast the animation from the Provided Class Camera. Use this Naming Convention: Lastname_FinalAnimation
Upload your In Progress (IP) video in a Reply to the Student Lounge Assignment and submit for credit eligibility.
Blocking: Create your breakdown poses
Pose your breakdown poses on Norman. Decide how he will get from the provided start pose to your one story pose.
Don't move all parts at the same rate - that will look mechanical. What body part leads the action? Lead with that part and delay other parts of the body. Here's a video from Animator Phil Hall & AnimSchool about different ways to think about Lead and Follow, Drag, Follow Through, etc. Follow-Through and Overlap: Improve Your Animation Links to an external site.
Define Arcing Movements with your breakdown poses (organic objects do not move in a straight line).
More help with Breakdowns from Opi the Fitness Animator Animation Breakdown Exercise - 3D Animation Tutorial Links to an external site.
IP (In-Progress)/Splining Pass
Convert your keys to splines.
While you are refining your splined animation, focus on telling a clear story, giving the audience one piece of information at a time.
Identify where movements pause unnecessarily, and change the keys and or tangent handles to help the movement flow.
Identify where movements seem too fast or slow. Adjust the timing of your keys or adjust the distance moved to make the movements' timing feel better.
Identify where movements need to ease out and ease in. Remember that unless an object is getting hit, it takes a little time to switch from being still (or slow) to moving fast. Add eases to reflect this.
Make sure you make choices about how you animate Norman going back to the start pose. This pose change needs to feel naturalistic, with lead and follow happening in the body.
Create a Playblast to Share in your Student Lounge Assignment (#2)
You will share your latest animation playblast in the next Student Lounge Assignment. Also -Upload your latest Maya Project Lastname_Final_v02 to your Final Module on Google Drive so that you have a backup.
In your response post, you will give at least one classmate feedback on their shared playblast. Tell them what you perceive to be the story that they are telling. Be sure to include both supportive and constructive critique.
Final/Polish Pass
Refine your animation.
Make sure your story beats are being clearly conveyed.
While you are refining your splined animation, focus on telling a clear story, giving the audience one piece of information at a time.
Identify where movements pause unnecessarily, and change the keys and or tangent handles to help the movement flow.
Identify where movements seem too fast or slow. Adjust the timing of your keys or adjust the distance moved to make the movements' timing feel better.
Identify where movements need to ease out and ease in. Remember that unless an object is getting hit, it takes a little time to switch from being still (or slow) to moving fast. Add eases to reflect this.
Make sure you make choices about how you animate Norman going back to the start pose. This pose change needs to feel naturalistic, with lead and follow happening in the body.
Create Playblast to Submit Final
Set the Render Settings to HD 1080.
Hide all unnecessary elements in the HUD (Display>HUD) and in the Playblast Viewport settings (go to top of viewport, to Show>Playblast Display).
Use these settings for the HUD (Heads Up Display):
Turn off all (uncheck all boxes) except "Camera Names" and "Current Frame"
Use these settings for the Playblast Viewport settings (go to top of viewport, to Show>Playblast Display).
Turn on (check on) Override Viewport
Below Override Viewport, turn off all (uncheck all boxes) except "Polygons" and "HUD"
Be sure that the start and end pose are still the same as in the original file.
Be sure that the start and end poses are held for 4 frames at the start and 4 frames at the end of the animation.
Playblast the animation from the Provided Class Camera. Use this Naming Convention: Lastname_FinalAnimation
Upload your final video to a Reply to this assignment before the stated deadline (see the top of this assignment) and submit for credit eligibility.
Resources to Help
Posing Help
Living Lines Library https://livlily.blogspot.com/
Line of Action from Stephen Silver: Art Tip 34 | Line of Action | Stephen Silver https://www.youtube.com/watch?v=gho6qVwZFlM
Help with Breakdowns
from Opi the Fitness Animator Animation Breakdown Exercise - 3D Animation Tutorial
https://www.youtube.com/watch?v=i3OMoVWLwmY
Help with Follow-Through and Overlap
from Animator Phil Hall & AnimSchool: Follow-Through and Overlap: Improve Your Animation https://www.youtube.com/watch?v=nuBxYaRz7So
Constraints (how to get Norman to hold and release an object)
from Learn to become an Animator How to use Parent Constrain in Maya | Create parent Constrain in Maya https://www.youtube.com/watch?v=nuBxYaRz7So
from AnimSchool An In-Depth Guide to Maya Constraints https://www.youtube.com/watch?v=uExLpKlOIM8
Video Reference Setup on Image Planes
from TechRuzz Tutorials How to Convert Video Into Image Sequence in Adobe Photoshop CC https://www.youtube.com/watch?v=sxN38Hp_dFI
from CGRiff Maya Basics - Image Planes https://www.youtube.com/watch?v=q1KYLK9a3D0
Criteria for Success
You uploaded your final project to your Final Module folder on the Google drive. You copied and pasted the link to your final Maya project in a Reply to this assignment and you uploaded your final Playblasted video in your Reply to this assignment. You submitted these in the reply to this assignment for credit eligibility.
Your video flows seamlessly with other students' videos (Camera, Render Settings, and Norman's Start/End pose match other videos).
You submitted your Work-In-Progress to the weekly Student Lounge assignments and collaborated with your fellow students to make sure your playblasts are all using the same settings. You helped each other out.
You playblasted your video from the provided camera, with settings included in the task instructions, and you did not change the provided camera.
Final video is between 80 and 104 frames long. This frame range must start with 4 frames of the held start/end pose and must end with 4 frames of the held start/end pose.
Within that overall frame range, you animated your own custom animation that is a minimum of 72 frames and a maximum of 96 frames.
The animation demonstrates your ability to use Parent Constraints and/or a combination of Point & Aim Constraints to make Norman hold and then release an object.
You used Maya Constraints to make Norman hold and then release an object. You can learn more about Constraints in the Resources to Help below, under Constraints (how to get Norman to hold and release an object).
You created a storytelling pose with the body according to the instructions.
You created facial acting poses to tell the story.
In your animation, Norman starts in the provided pose and then pulls an object out of the box.
Norman looks at object as he pulls it out of the box.
Norman reacts to the object.
Norman drops or throws the object.
Object is not visible on screen at the end of your animation.
Norman naturalistically moves back into the start pose by the end of your animation.
1
2
3
4
5
6
7

8
9

10
11
